预编译资源模块
脚本外链分包
通过配置字段 externals 配置通过外链接入的第三方模块包。将 react、react-dom 等基础包通过 CDN 引入,不打入 bundle 中。
配置示例:
module.exports = {//...externals: {jquery: 'jQuery',},};
动态链接库
Webpack 4+ 以上可用 HardSourceWebpackPlugin 插件代替
所谓动态链接,就是把一些经常会共享的代码制作成 DLL 档,当可执行文件调用到 DLL 档内的函数时,Windows 操作系统才会把 DLL 档加载存储器内,DLL 档本身的结构就是可执行档,当程序有需求时函数才进行链接。透过动态链接方式,存储器浪费的情形将可大幅降低。
| 缓存 | DLL |
|---|---|
| 把常用的文件存储到内存或硬盘中 | 把公共代码打包为 dll 文件放到硬盘中 |
| 再次打包,直接读取缓存 | 再次打包,读取 dll 文件,不重新打包 |
| 加载时间减少 | 打包时间减少 |
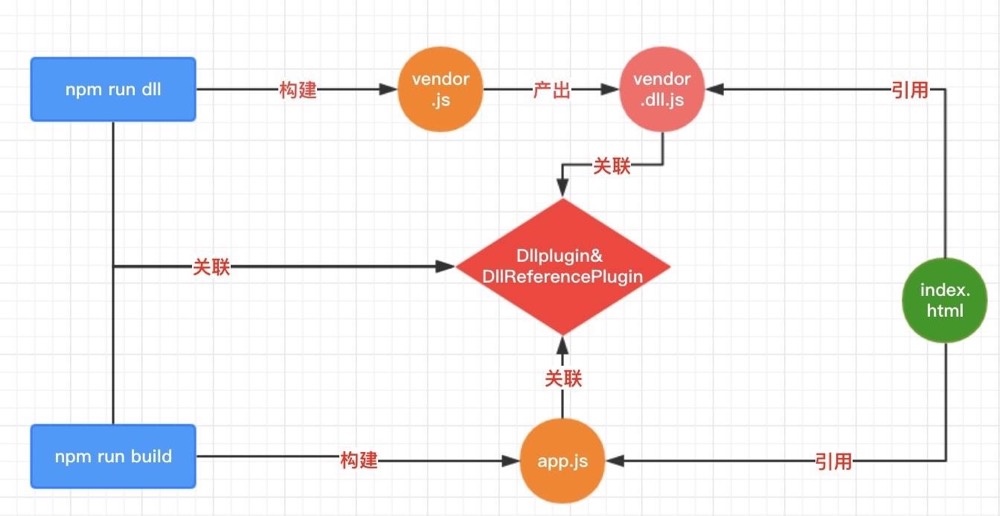
DllPlugin 和 DllReferencePlugin 这一方案,实际上也是属于代码分割的范畴,但与 CommonsChunkPlugin 不一样的是,它不仅仅是把公用代码提取出来放到一个独立的文件供不同的页面来使用,它更重要的一点是:把公用代码和它的使用者(业务代码)从编译这一步就分离出来,换句话说,我们可以分别来编译公用代码和业务代码了。这有什么好处呢?很简单,业务代码常改,而公用代码不常改,那么,我们在日常修改业务代码的过程中,就可以省出编译公用代码那一部分所耗费的时间了。
整个过程大概是这样的:
- 利用 DllPlugin 把公用代码打包成一个
dll文件(其实本质上还是 JS,只是套用概念而已);除了 Dll 文件外,DllPlugin 还会生成一个manifest.json文件作为公用代码的索引供DllReferencePlugin使用。 - 在业务代码的 Webpack 配置文件中配置好 DllReferencePlugin 并进行编译,达到利用 DllReferencePlugin 让业务代码和 Dll 文件实现关联的目的。
- 在各个页面
<head>中,先加载dll文件,再加载业务代码文件。

用法:要使用 DllPlugin 通常需要额外新建一个配置文件。所以对于用这种方式打包的项目,一般会有两个配置文件 webpack.config.js 和 webpack.dll.js。
打包静态公共资源
分离基础包 library 和业务包:
另外需要 add-asset-html-webpack-plugin 插件将分离的依赖包插入 HTML 中,当然你也可以手动插入,但是如果该分离依赖包是带有 Hash 值的,那么最好还是使用插件插入。
// webpack.dll.jsconst path = require('path');const webpack = require('webpack');const AddAssetHtmlPlugin = require('add-asset-html-webpack-plugin');module.exports = {// manifest 缓存文件的请求上下文(默认为 Webpack 执行环境上下文)context: process.pwd(),resolve: {extensions: ['.js', '.jsx', '.json', '.less', 'css'],modules: [__dirname, 'node_modules'],},entry: {// 指定需要打包的 JS 模块,或是 CSS/Less/图片/字体文字等// 但注意要在 module 参数配置好相应的 loaderlibrary: ['react', 'react-dom', 'redux', 'react-redux'],},output: {// 这个是最终生成的包含分离的包的文件名称// 需要手动或者 AddAssetHtmlWebpackPlugin 添加进 HTML 中filename: '[name].dll.js',path: path.resolve(__dirname, './build/library'),// 存放 dll 文件的全局变量名称,需要注意命名冲突library: '[name]',},plugins: [new webpack.DLLPlugin({// 当前 dll 的所有内容都会存放在这个参数指定变量名的一个全局变量下// 需要与 output.library 保持一致name: '[name]',// manifest.json 文件的输出位置path: './build/library/[name].json',}),// 文件路径与 DllPlugin 输出的位置要一致new AddAssetHtmlPlugin([{ filepath: path.resolve(__dirname, './build/library/*.dll.js') }]),],};
通过输入命令 webpack --progress --colors --config ./webpack.dll.js
运行 npm run build:dll,运行完毕后,会在 ./build/library(因为是不常变的第三方库,所以不放在 dist 中,因为每次构建都会清除 dist 文件夹)目录下生成对应库的文件。
项目入口文件引用静态公共资源
// 入口文件 index.js// 引入的公共模块如果在 library.dll.js 中有被引用过,那么编译的时候直接使用静态文件 library.dll.jsimport 'react';import 'react-dom';
打包入口文件
然后,需要在 webpack.config.js 中使用 DllReferencePlugin 引入 manifest.json 关联引用:
// webpack.config.jsmodule.exports = {plugins: [// 告诉 Webpack 使用了哪些第三方库代码new webpack.DllReferencPlugin({// 映射到 JSON 文件上去manifest: require('./build/library/manifest.json'),}),],};
配置好 DllReferencePlugin 了以后,正常编译业务代码即可。不过要注意,必须要先编译 Dll 并生成 manifest.json 后再编译业务代码;而以后每次修改 Dll 并重新编译后,也要重新编译一下业务代码。
项目模版中引用公共静态资源
最后一步,在模版中注入 library.dll.js。
<script src="/build/library/library.dll.js"></script>
如此,在接下来的本地开发(dev 过程)和线上构建过程,将不再重复静态公共资源的构建,极大地缩减我们的构建时间。
HardSourceWebpackPlugin
HardSourceWebpackPlugin 为模块提供中间缓存步骤,缓存默认的存放路径是: node_modules/.cache/hard-source。
为了查看结果,您需要使用此插件运行 Webpack 两次:第一次构建将花费正常的时间。第二次构建将显着加快(大概提升 90%的构建速度)。
const HardSourceWebpackPlugin = require('hard-source-webpack-plugin');module.exports = {plugins: [new HardSourceWebpackPlugin({// Either an absolute path or relative to webpack's options.context.cacheDirectory: 'node_modules/.cache/hard-source/[confighash]',// Either a string of object hash function given a webpack config.configHash: function (webpackConfig) {// node-object-hash on npm can be used to build this.return require('node-object-hash')({ sort: false }).hash(webpackConfig);},// Either false, a string, an object, or a project hashing function.environmentHash: {root: process.cwd(),directories: [],files: ['package-lock.json', 'yarn.lock'],},info: {// 'none' or 'test'.mode: 'none',// 'debug', 'log', 'info', 'warn', or 'error'.level: 'debug',},// 自动删除体积大的和存在已久的缓存cachePrune: {// 缓存在该时间内不会被删除(单位:毫秒)maxAge: 2 * 24 * 60 * 60 * 1000,// 在删除任何缓存之前,所有缓存一起必须大于'sizeThreshold'。它们加在一起必须至少有这个(默认值:50MB)大的字节sizeThreshold: 50 * 1024 * 1024,},}),],};